What’s the Ultimate DIY Nail Prep Routine for Smooth, Long-Lasting Color?
A flawless manicure begins before you even pick up a brush. This guide will show you how to get a Long-lasting gel manicure at home. It's all about making your nails ready for polish, ensuring it lasts longer and looks better.
By following our steps, you'll make your Home manicure routine easy and effective. Start by removing old polish and shaping your nails. Then, buff them gently to open up the keratin scales. Clean your cuticles and finish with a base coat for a strong grip. Each step helps prevent common nail problems.
At Topclou Nailhaus, we believe great nails start with care. Our prep routine protects your natural nails and makes colors pop. Ready to get started and prep like a pro? Let's begin.

Why Proper Nail Prep Matters for Smooth, Long-Lasting Color
A clean, even canvas is key for pro results at home. For nail prep for beginners, start by clearing residue and refining the plate. These steps help color payoff, shine, and last longer without extra layers.
Small, careful steps add up. Use smooth nail surface tips to level texture and manage oils before any base coat. To prep nails for gel polish, cleanse, refine, and dehydrate in that order.

Stronger adhesion to prevent gel polish lifting
Light buffing opens keratin scales for better base coat grip. Clean the plate, then dehydrate with a proper nail cleanser to prevent gel polish lifting. This prep supports thin, even layers that cure fully and hold.
- Wipe with lint-free pads to remove dust and oils.
- Choose a pH-balancing prep for steady adhesion.
Even out ridges for a smooth nail surface and polished look
Ridge smoothing improves flow and color uniformity. Apply smooth nail surface tips like gentle, directional buffing and a ridge-filling base if needed. This reduces shadowing and streaks, making light shades look better.
- Buff lightly to avoid thinning the nail.
- Use a fine-grit buffer and keep strokes short and controlled.
Reduce bubbles, smudges, chipping, and marbling
Dust and oils trap air and disrupt curing. For nail prep for beginners, cleanse between steps and cap edges. These tips cut down on bubbles and marbling while improving chip resistance.
- Degrease the plate before base coat.
- Apply thin layers and cure per lamp guidance.
Protect nail health by removing dead skin and minimizing breakage
Softened cuticles that are gently pushed back keep product off skin and protect the matrix. How to prep nails for gel polish also includes clearing dead skin so the seal stays intact and wear extends.
- Use cuticle remover.
- Push back with a wooden pusher; avoid cutting live tissue.
When every layer meets a clean, smooth surface, color lays flat and lasts longer. Consistent habits make results repeatable, from classic lacquer to gel.
Essential Tools and Clean Nails Checklist Before You Start
Start with a focused kit and a clear plan. A concise checklist helps you clean nails before polish and more. Follow the Topclou nail prep guide for precision and smart hygiene.

Clean nails before polish: removers, cotton pads, dust brush
Choose a remover that works for you, like acetone or Green Nail Cleanser. Use lint-free cotton pads and swabs for tight spots. A soft dust brush helps remove particles.
- Pro tip: Use a dedicated prep set to keep tools organized and clean.
- Don't forget a cuticle pusher, nipper, and base coat for later.
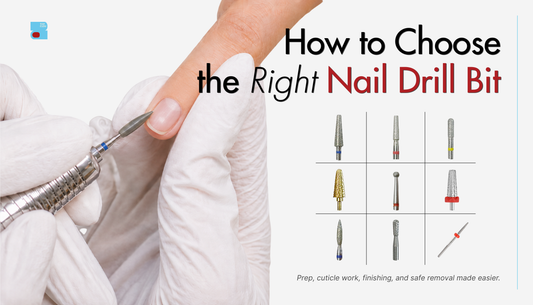
File nails properly: choose the right grit and technique
Use the right grit for your nails. 100/180 for shaping, 180/240 for fragile edges. File in one direction to preserve the nail.
- Use light, even strokes to avoid heat and peeling.
- Refine corners to prevent snags before color.
Buff nails at home: when and how much is enough
Use a priming emery board or mild buffer for ridges. Buff along nail growth with minimal pressure. Aim for a satin surface, not shine.
- Smooth only high spots; leave natural strength intact.
- Finish by dusting to clear micro debris.
Remove oils nails: nail cleanser tips vs. alcohol
Degreasing is key for lasting color. Use a dedicated cleanser to remove oils without drying out. Alcohol can work, but it's harsh. A pH bonder or primer helps adhesion.
- Cleanse every nail edge and sidewall with a pad or swab.
- Let the plate flash dry before base coat placement.
A compact pro kit makes your process clean and quick. It includes a file, emollient, priming board, pusher, dust brush, and optional nipper. This kit helps you clean nails before polish, file nails properly, buff nails at home, and remove oils nails with confidence.
Step-by-Step DIY Nail Prep Routine
This DIY nail prep routine keeps color smooth and helps it last. It’s perfect for both nail prep beginners and pros. Work gently, stay consistent, and you’ll get a flawless base every time.
Remove old polish and residue thoroughly
Begin with a clean slate. Use a cotton pad soaked in remover to sweep off old lacquer until it’s gone. For gel, acrylic, or dip, soak for 10–15 minutes to break it down fully. Any leftover can cause ripples and chips.
After, wipe each nail to remove dust and oils. This careful cleanse is the foundation of any DIY nail prep routine.
Prep nail shape: trim and file from edge to center in one direction
Trim nails to a manageable length, leaving a slim white tip for strength. Then, file nails properly from the outer edge toward the center in one direction. Repeat on both sides and finish the top edge so the curve is even.
Strokes in one direction help preserve keratin layers and prevent splits. If your tips are delicate, lightly file under the free edge to refine the line and prep nail shape with control.
Buff lightly to open keratin scales without weakening
Use a fine buffer for a few gentle passes along nail growth to even micro-ridges. The goal is to buff nails at home just enough to open keratin scales so base coat grips better.
Keep pressure low and avoid over-buffing. A soft, satin finish signals you’ve done enough for nail prep for beginners and seasoned hands alike.
Soften and push back cuticles safely
Soak nails in warm water and apply an emollient for about two minutes. With a rounded pusher or orangewood stick, guide the cuticle back and lift only nonliving tissue.
If trimming, nip only what protrudes to protect the matrix. Dust away debris and cleanse the plate once more. Now the surface is ready, the edges are sealed, and the prep nail shape supports long wear.
Long-lasting gel manicure, Home manicure routine, DIY nail prep routine
Get a salon-quality manicure at home with a few simple steps. Clean nails, layer colors carefully, and cure them right. This way, your nails will look great for weeks.
How to prep nails for gel polish for maximum adhesion
First, remove all old polish and dust. Shape your nails in one direction to seal them. Then, buff them lightly to open up the keratin scales.
Use a special cleanser to remove oils. Apply a pH bonder or acid-free primer next. These steps help the gel polish stick well and prevent lifting.
- Brush away debris with a clean dust brush.
- Dehydrate the plate, focusing on the sidewalls and free edge.
- Keep skin and cuticles dry to prevent contamination.
Gel base coat tips and apply thin gel layers
For a good gel base coat, apply a thin, even layer. Make sure to cover the free edge. Use thin layers for color, as this prevents heat spikes and wrinkles.
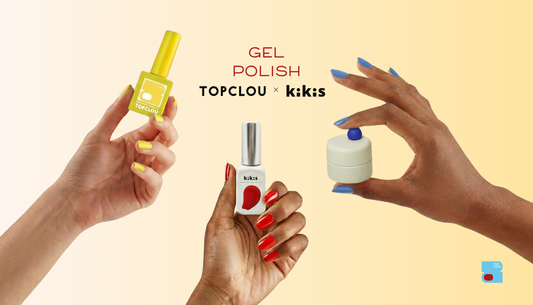
Choose Topclou gel polish for smooth application and long-lasting wear. Follow these tips for a flawless manicure.
- Float the brush; do not press hard or flood the cuticle.
- Wipe excess product off the stem before each stroke.
- Flash-check side angles to confirm even coverage.
Cure gel polish correctly with a mini nail lamp
Always cure gel polish as directed by the manufacturer. Use a focused lamp like the Topclou mini nail lamp for even curing. Make sure to rotate your hand for even light.
Ensure each layer, including the base, color, and top coat, is fully cured. This will seal your nails and make them last longer.
- Keep nails flat inside the lamp for uniform exposure.
- Avoid stacking coats before a full cure to prevent soft spots.
- Finish with a top coat and a final cure for a sealed surface.
Avoid bubbles in gel polish for a smooth finish
Work slowly to avoid bubbles. Stir gently if needed; never shake bottles. Control brush pressure to reduce air bubbles.
Keep coats thin to help air escape. Cap edges and remove lint with a dust brush. Let each layer level before curing for a smooth finish.
- Keep product away from heat sources that can cause expansion.
- Use fresh, well-sealed Topclou gel polish to maintain viscosity.
- Patience with thin films and steady strokes prevents pits and bumps.
Cuticle Care and Surface Smoothing for Beginners
Think of your cuticles as a shield. Start by softening them with a gentle emollient and warm water. Use a pusher to gently guide the skin back, following the direction of nail growth. This helps tidy the area without harming the nail plate.
Be careful when removing dead skin. If you need to use nippers, only trim what's clearly dead. This avoids injury or infection. Doing this weekly keeps your nails looking neat and helps polish stick better.
For smoothing the nail surface, use a sponge-textured priming board. Follow these steps: buff from base to tip with light pressure, focusing on ridges. Do this once every two weeks to avoid thinning the nail plate.
After shaping and buffing, brush away dust. Clean your nails before applying polish to remove oils. This ensures even coverage and prevents bubbles.
Adding a keratin-smart routine is beneficial. Light buffing opens keratin scales, then apply a supportive base like Topclou keratin nail treatment. This combo promotes long-lasting wear and a smooth finish.
Strengthen and Repair: Caring for Weak or Damaged Nails Before Gel
Weak nails need a gentle approach. Use light touch, supportive shapes, and products that strengthen the nail plate. This helps your gel last longer and look smoother.
Strengthen weak nails and nail repair before gel
Begin with gentle tools and a plan for nail repair. Choose a 180/240 grit file or a glass file to avoid damage. Use a reinforcing base coat and, if needed, a pH bonder or acid-free primer for better adhesion.
- Use light pressure and file in one direction, edge to center.
- Adopt a short schedule for breaks between manis to strengthen weak nails.
- Follow the Topclou nail prep guide if you want a clear, stepwise routine.
Keratin nail care and when to buff less
Buff only to smooth ridges and always in the direction of growth. Minimal passes protect keratin integrity and reduce thinning. A targeted formula like Topclou keratin nail treatment supports keratin nail care without heavy abrasion.
- Limit buffing frequency; keep plates intact for better gel wear.
- Pair light buffing with a strengthening base to lock the surface.
Moisturize wisely, then fully dehydrate before base coat
Hydrate with fragrance-free cuticle oil or a simple hand cream, then give time to absorb. Before the base coat, cleanse and fully dehydrate the nail plate with a dedicated nail cleanser or dehydrator. Alcohol is not a substitute and can over-dry.
- Wipe each nail thoroughly to remove residue and improve bond.
- Use thin layers of reinforcing base to support weak spots.
Prevent splitting with gentle filing and shape selection
To prevent splitting, keep tips short and select supportive shapes like rounded, oval, or short squoval. File from edge to center in one direction to limit stress. This small change reduces snags and guards the free edge.
- Seal the edge with a final, light pass of the file.
- Combine shape control with Topclou keratin nail treatment for added strength.
Steady care, smart tools, and the Topclou nail prep guide create a balanced base that resists chips and lifts while staying kind to the natural nail.
Topclou Nailhaus Ritual: Pro-Grade Prep and Mood-Boosting Color Payoff
The Topclou nail prep guide starts with a pro-first approach. It removes all old product, shapes nails in one direction, and buffs lightly. This opens keratin scales without thinning the nail plate.
Next, soften and push back cuticles, dust thoroughly, and cleanse to degrease. Add a pH bonder or primer if your nails are oily. This protects natural nails, sets color, and reduces bubbles and smudges in your home manicure.
Apply thin, even base and color coats of Topclou gel polish for a smooth finish. Cap the free edge each pass to prevent tip wear. Cure each layer fully with the Topclou mini nail lamp to lock in shine and strength.
Choose mood nail colors that match your day—calm neutrals, bold reds, or cool blues. The prep-first ritual makes every hue richer, with crisp lines and a uniform surface. When the base is right, Topclou gel polish reflects light cleanly, so the finish looks deep, even, and confident.
At Topclou Nailhaus, great nails start with care. This streamlined Topclou nail prep guide pairs expert prep with precise curing under the Topclou mini nail lamp. Follow it once, and your home manicure routine will deliver a durable, glossy, long-lasting gel manicure that stays true to your style and mood.
FAQ
Why does proper nail prep matter for smooth, long-lasting color?
Proper prep removes oils and dead skin. It opens keratin scales for better base coat grip. This makes the color lay down evenly.
How does nail prep improve adhesion and prevent gel polish lifting?
What tools do I need for a professional home manicure routine?
How do I clean nails before polish to remove oils and residue?
What’s the best way to file nails properly without causing splits?
How much should I buff nails at home for a smooth nail surface?
How do I remove old polish and residue thoroughly before starting?
How should I prep nail shape for symmetry and strength?
What’s the safest way to soften and push back cuticles?
How do I prep nails for gel polish for maximum adhesion?
What are expert gel base coat tips and how thin should layers be?
How do I cure gel polish correctly with a mini nail lamp?
How can I avoid bubbles in gel polish for a smooth finish?
What are beginner manicure tips for cuticle care and surface smoothing?
How do I strengthen weak nails and repair before applying gel?
When should I buff less for keratin nail care?
Should I moisturize before or after prep, and how do I remove oils before base coat?
How can gentle filing and shape selection prevent splitting?
What is the Topclou Nailhaus prep ritual?
Which Topclou products support a salon-level, long-lasting gel manicure at home?
How does Topclou keratin nail treatment fit into a DIY nail prep routine?
Previous
What Do Nail Colors and Emotions Reveal About You?
Next
Why Your Cat Eye Nails Look Flat? How to Fix Them?